

Disclaimer: This post may contain affiliate links, meaning we get a small commission if you make a purchase through our link at no extra cost to you. For more information, please visit our Disclaimer Page.
Starting a travel blog might seem like a big task, but breaking it down into smaller, manageable steps makes it much easier.
Keep in mind that building a blog takes patience—it may be months or even years before it turns into a steady source of income.
Learning how to start a travel blog is an investment in your future. With consistent effort, it can open doors to exciting opportunities and rewarding experiences.
Here’s a practical guide to help you get started.

Should I Start a Travel Blog?
Before setting up your travel blog, ask yourself one important question:
“Is travel blogging something I should pursue?”
Below are some solid reasons to help you decide if this is the right move for you.
- A Passion for Travel: If you have a genuine love for traveling, starting a blog can be a great way to document your journeys. It helps you hold onto the memories while motivating you to keep exploring new places. Your experiences could also inspire others to step out of their routines, whether that means visiting hidden gems or trying out different cultural traditions.
- Helping Others Through Your Experience: Travel blogging goes beyond sharing personal stories—it gives you the chance to connect with other travelers by providing valuable insights. You can offer practical tips, recommendations, and advice to make their trips smoother. From budgeting hacks and packing tips to must-visit spots, your blog could become a trusted resource for anyone looking to travel smarter.
- Turning Your Blog into a Six-Figure Business: When done thoughtfully, a travel blog can generate significant income. It might start as a side hustle, but with the right approach, it can grow into a six-figure business. Many travel bloggers achieve this by monetizing their blogs through affiliate links, ad revenue, sponsored content, and brand collaborations.
If these reasons strike a chord with you, starting a travel blog could be a fantastic journey to embark on.
There’s no need to wait. Whether you do it for passion, profit, or to help others, your travel stories have the potential to take you—and your readers—places you’ve never imagined.
How to Start a Travel Blog in 7 Simple Steps

1. Pick the Right Travel Blog Niche
Choosing a niche is one of the most critical steps when starting a travel blog. A niche refers to the focused topic or theme that defines the kind of content you’ll share. Having a clear niche not only sets your blog apart from the rest but also attracts an audience looking for exactly what you offer.
Travel blogging covers a wide spectrum of interests, so narrowing your focus makes it easier to grow an audience and reduce competition. Your niche should align with your interests, lifestyle, and expertise—something you enjoy writing about and can keep up with over time.
Top Travel Blog Niche Ideas to Consider in 2024
Below are fresh travel niche ideas that are trending and relevant for today’s readers:
- Eco-friendly travel: Focused on sustainable tourism and low-impact trips.
- Heritage travel: Exploring cultural roots, historic sites, and ancestral connections.
- Wellness retreats: Covering travel for mental health, yoga, and wellness holidays.
- Pet-friendly travel: Guides on traveling with pets, pet-friendly hotels, and attractions.
- Accessible travel: Focused on travelers with disabilities, including accessibility tips and reviews.
- Festivals and events travel: Covering unique events, cultural festivals, and celebrations worldwide.
- Slow travel: Encouraging longer stays to deeply experience places and cultures.
- Off-the-beaten-path travel: Sharing hidden gems and less-known destinations.
- Photography travel: Tips on capturing beautiful travel moments and scenic locations.
- Seasonal travel: Travel guides tailored to specific seasons or holidays.
- Voluntourism: Combining travel with volunteer work for meaningful experiences.
- Culinary tours: Covering food and drink festivals, wine tours, and local markets.
- Religious or pilgrimage travel: Visiting spiritual destinations and pilgrimage routes.
- Travel safety tips: Focused on safe travel, including solo safety strategies and health advice.
- Expats and relocation guides: Providing advice for those moving abroad long-term.
When it comes to picking a niche for your travel blog, the options really are endless! The only limits are your own imagination and what you think people would love to read about.
If you notice a group of folks eager for tips or inspiration on a certain type of travel—like budget adventures, cultural experiences, or even food tours—then you’ve found a great opportunity.
Think about what excites you most and how that can connect with others.
Your unique perspective could fill a gap and inspire fellow travelers along the way!
2. Do Your Keyword Research
The quickest way to gauge the demand for your travel blog niche is by conducting thorough keyword research. Use tools like Mozbar, Ubersuggest, or Ahrefs to discover popular keywords related to your niche. These tools will help you see what people are searching for, how many are looking for information on those topics, and what they might be willing to spend money on. This insight is invaluable for shaping your content strategy.
Analyze the Competition
No matter your niche, there will likely be established bloggers already in the game, and that’s a good thing!
Check their blogs to see what works for them, including their monetization strategies. Tools like Ahrefs can help you understand how they attract traffic.
Also, consider setting up Google Alerts to keep track of their activities. If you see others successfully making money in your niche, there’s a good chance you can do the same!
By researching keywords and analyzing competitors, you’ll be better equipped to choose a travel blog niche that not only excites you but also has the potential to be profitable.
3. Choosing a Name for Your Travel Blog
Selecting the right name for your travel blog can be tricky, but these tips will help you create a catchy and effective brand.
- Reflect Your Niche: Choose a name that hints at your travel focus, whether it’s adventure, food, or family trips.
- Include SEO Keywords: Include relevant keywords in your blog name to improve search engine visibility and attract more readers.
- Find Inspiration: Read travel-related books or articles to spark ideas. A thesaurus can also help you discover catchy alternatives.
- Avoid Clichés: Steer clear of overused phrases and easily misspelled words to ensure your blog name stands out.
By following these tips, you’ll be on your way to a compelling travel blog name that reflects your passion and enhances your online presence.
4. Set up Hosting
To make your travel blog accessible to the world, you’ll need to:
- Select a blog hosting plan
- Register your domain name
Fortunately, this process is easier and more affordable than ever, often costing less than $3.00 a month.
What Is Blog Hosting?
Blog hosting refers to a service provided by companies that maintain servers and the technology necessary to keep your blog online.
Choosing a dependable hosting platform is crucial from the beginning; unreliable hosting can lead to your blog being inaccessible at times, which can frustrate readers and negatively impact your search engine ranking.
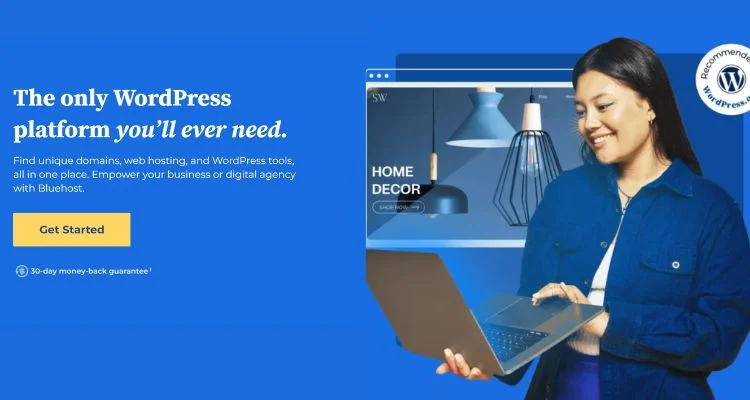
One highly recommended hosting service is Bluehost. Known for being one of the best all-around web hosting options available, Bluehost offers budget-friendly plans starting at just $1.99 per month, which include a free domain name.
Additionally, you’ll have access to 24/7 technical support to assist you whenever you need help.
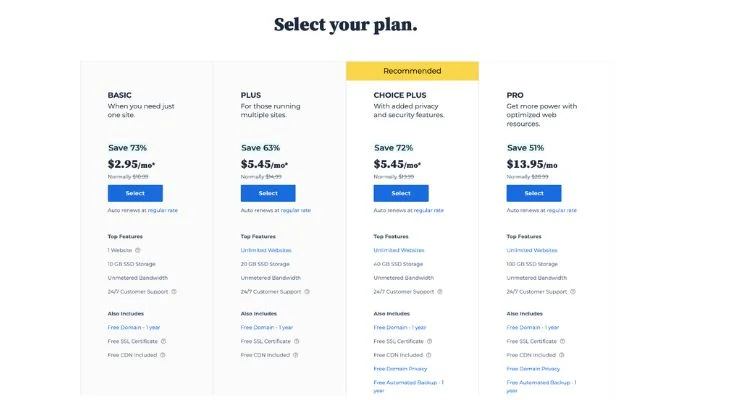
Hit the button “Get Started Now” and you’ll be redirected to a page outlining their different hosting plans.
Avoid the recommended “Choice Plus” plan; you really don’t need it. I suggest opting for the cheapest plan at just $2.95 per month, which is what I always use when launching a new site.
The “Plus” plan is designed for those who manage multiple blogs, which isn’t the case for you right now. The added privacy and security features of the “Choice Plus” plan aren’t necessary since there are free, equally effective alternatives available. Similarly, the “Pro” plan is geared towards websites that attract high traffic, so it’s not worth paying extra for resources you won’t need.
Choose the “Basic” plan, and you’ll be directed to the next screen:
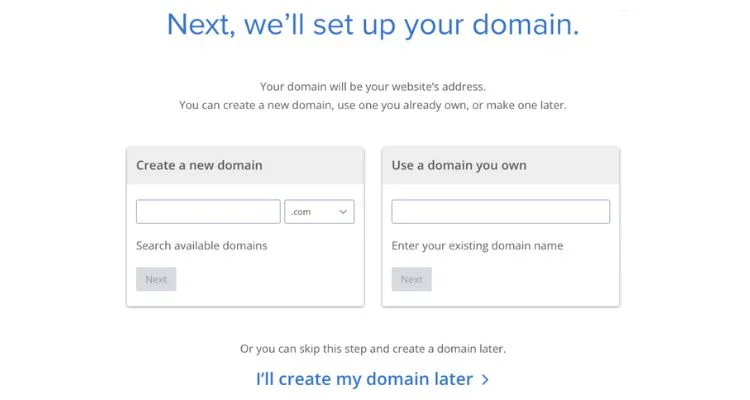
This part is straightforward! Enter your chosen blog name in the box on the left and click “Next.” Make sure to double-check it for any spelling errors!
Seriously, take a moment to verify it again. You’d be surprised how many people accidentally register a domain name with typos and only realize it after everything is set up and paid for.
Once you’ve entered your domain name and clicked “Next,” it’s time to proceed with the payment for your hosting.
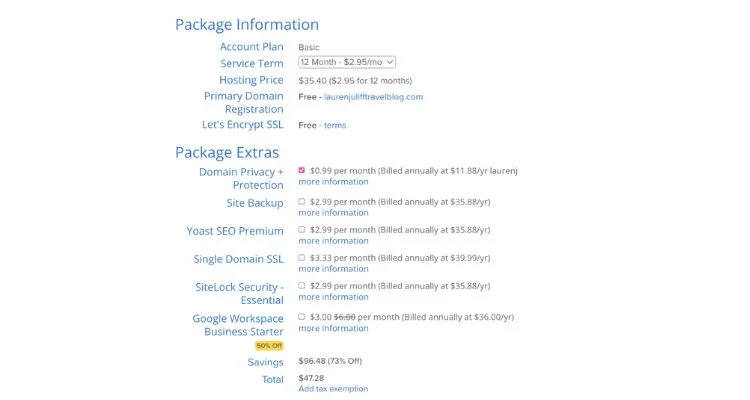
At this stage, Bluehost will attempt to upsell you on extras that you likely don’t need. I’ll guide you on which add-ons are worth considering and which ones you can skip to save some money.
Let’s explore the available options and clarify what each one entails, highlighting why most of them may not be essential for you.
Service Term Option: I suggest choosing the 12-month plan at $2.95 per month instead of the 36-month plan, which costs $4.95 per month. This choice provides flexibility and a lower cost upfront, which is ideal for new bloggers.
Why a Shorter Commitment? Bluehost is mainly for beginner bloggers who might not see much traffic initially. After a year, you’ll likely want to upgrade to a more robust hosting service that can handle increased traffic, so there’s no reason to commit to a longer-term plan right now.
Recommended Add-on: The only additional feature I recommend is domain privacy and protection. This feature keeps your personal information private by substituting your home address with a generic Bluehost address, helping you maintain your privacy online.
Skipping the Extras: The other features offered are largely unnecessary. You can find quality free alternatives for everything, such as backup solutions, the free version of Yoast SEO, and SSL certificates at no cost. There’s no need for Google Workspace Business Starter at this stage; I’ll dive deeper into these tools later in the guide.
Once you’ve filled in your personal and payment information, you’re all set!
Congratulations! You’ve successfully set up your hosting and domain name—pretty straightforward, right?
5: Style Your Unique Travel Blog Design
Now that your hosting is established, it’s time to get WordPress up and running. This platform will be the backbone of your website, allowing you to publish posts, manage comments, install plugins, and customize your travel blog’s appearance.
This step is vital because it shapes how visitors interact with your blog and what they experience when they land on your page.
Choose the Right WordPress Theme
Time to beautify your site! Your theme sets the tone for your blog and allows you to personalize it to match your vision. Here are a couple of great options for finding the perfect theme:
- StudioPress: One of my top picks is StudioPress, which offers high-quality themes built on the Genesis Framework. For about $59.95, you can choose from a variety of professional designs that are mobile-responsive and SEO-friendly. The themes come with extensive documentation and a helpful support team to assist you with any questions. You can preview the themes before purchasing, making it easy to find the right fit for your blog.
- TemplateMonster: If you’re looking for unique and stylish designs, check out TemplateMonster. Themes typically range from $29 to $99, and you’ll find an impressive array of customizable options. Their customer support is responsive, helping you resolve any issues quickly. I’m currently using a TemplateMonster theme for my blog and love the flexibility it offers!
or
For most beginners, I recommend starting with the free Astra theme, which balances functionality and aesthetics while keeping you on a budget.
Once you get your theme, installation is a breeze. Each theme will include instructions, usually with an installable WordPress file.
To install, log into WordPress, go to Appearance > Themes > Upload, and upload the zip file you downloaded.
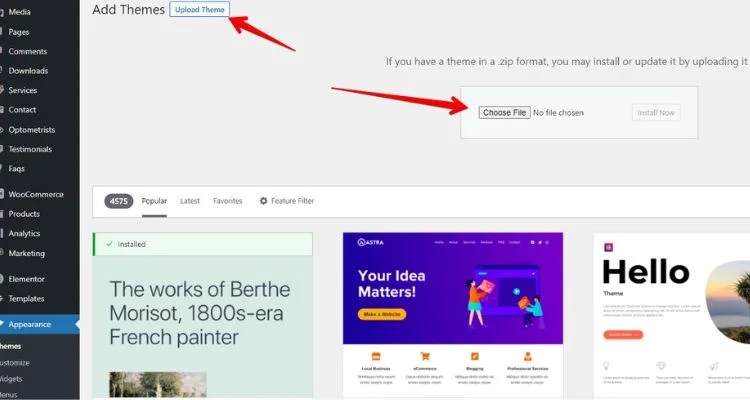
If you encounter any issues, both StudioPress and TemplateMonster offer support forums to help you out. And if you’re still stuck, feel free to reach out!
Focus on Your Branding
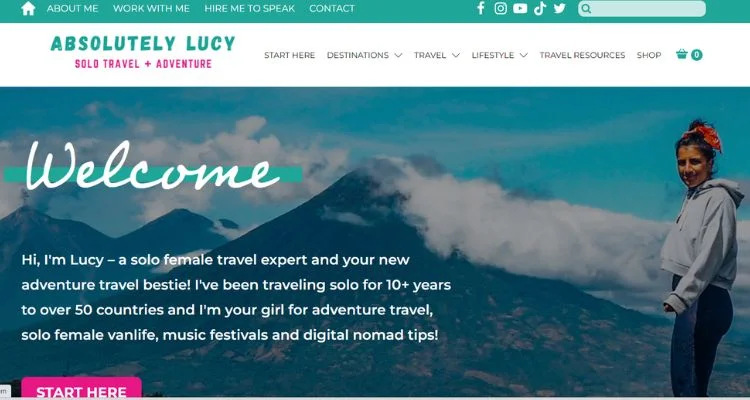
Branding is crucial in the design process. Take inspiration from Lucy’s travel blog, Absolutely Lucy, where the enchanting green and rose pink vibes create a cohesive aesthetic.
Lucy’s unique font and vibrant visuals immediately capture the essence of her adventures, making her blog instantly recognizable.
Create Your Logo
While your logo is important for establishing your travel blog’s identity, don’t stress about it in the early stages—focus on creating great content first.
Use Canva to customize free templates, hire a designer on Fiverr for a professional touch, And the thing is, it can be simple, minimal, nothing too fussy.
For inspiration, look at how Lucy’s logo on Absolutely Lucy captures her whimsical adventures and blends seamlessly with her vibrant visuals.
Branding is essential for creating a cohesive aesthetic for your blog. Consider these key aspects:
- Color Palette: Choose colors that resonate with your personality, similar to how Lucy’s enchanting green and rose pink theme complements her photography and overall vibe.
- Typography: Select fonts that reflect your style and enhance readability. Lucy’s unique font choices contribute to the playful feel of her blog, making it instantly recognizable.
- Overall Blog Look: Aim for a visually appealing layout that mirrors your unique aesthetic, like the harmonious blend in Lucy’s blog.
By thoughtfully crafting your blog’s design and branding elements, you’ll create a memorable experience that sets you apart in the travel blogging world.
Enhance Your Blog with Plugins
Like themes, plugins enhance specific features of your blog. Here are some must-have plugins to consider:
Enhance Your Travel Blog with Essential Plugins
After selecting your theme, it’s time to install some WordPress plugins to add functionality to your travel blog. Unlike themes, which dictate the aesthetics, plugins improve specific features.
Here are five essential plugins to kickstart your travel blog:
- Rank Math: A powerful SEO plugin that helps improve your blog’s search engine optimization, boosting your chances of ranking higher in search results.
- Social Snap: A user-friendly social sharing plugin that allows visitors to share your content with a single click, designed to keep your site running smoothly.
- MapifyPro: Perfect for travel blogs, this plugin lets you create interactive maps showcasing your travels with customizable markers for different locations.
- Envira Gallery: This plugin is great for managing and displaying your photos, ensuring your travel images look stunning and are easy to navigate.
- WP Fastest Cache: One of the top performance optimization plugins to ensure your site loads quickly, enhancing user experience and engagement.
6. Create Important Pages
Before launching your travel blog, set up a few key pages that will establish your brand and provide essential information for your readers. Here are the must-have pages:
- About Page
Share your story, travel philosophy, and what readers can expect from your blog. Use this page to connect on a personal level and showcase your unique voice. - Contact Page
Make it easy for readers and brands to reach you. Include a simple contact form and your email address, encouraging inquiries and collaboration opportunities. - Privacy Policy
This page is crucial for compliance, especially if you collect any personal information from your readers. Clearly outline how you handle data and cookies. - Disclaimer
Include a disclaimer to inform readers about affiliate links, sponsored content, or any potential conflicts of interest. Transparency builds trust with your audience. - Resources Page
Create a curated list of tools, services, and products you recommend for travelers. This can include packing lists, travel gear, or essential apps, enhancing your credibility as a travel expert.
By setting up these important pages, you’ll provide a solid foundation for your blog and create a better experience for your audience.
7. Monetize Your Travel Blog
- Affiliate Marketing Programs: Joining affiliate programs is a popular way to monetize your travel blog. Sign up for programs that align with your niche, such as: Booking.com: Earn commissions by promoting hotel bookings. and Amazon Associates: Promote travel gear and earn a commission on purchases.
- Sponsored Content and Brand Deals: As your blog grows, consider collaborating with brands for sponsored content and trips. Reach out to relevant brands and pitch ideas for collaborations that benefit both parties.
- Offer Digital Products or Services: Create and sell digital products, such as travel guides, online courses, or consulting services. This diversifies your income streams and positions you as an expert in your niche.
- Ad Revenue: Once your traffic increases, monetize your blog through ad networks like Google AdSense or Mediavine. Ensure that ads do not disrupt the user experience and maintain a clean, professional layout.
7. Stay Consistent and Keep Learning
- Consistency is Key: Establish a realistic content schedule and stick to it. Consistent posting builds audience trust and keeps readers returning for more.
- Track Progress and Analytics: Utilize Google Analytics to monitor your blog’s performance. Analyze traffic sources, audience behavior, and popular content to make informed decisions about your blogging strategy.
- Keep Up with Trends and Technology: Stay updated on the latest travel trends and technology advancements. Embrace AI tools for content creation, social media management, and travel planning to streamline your processes.
Conclusion:
Starting a travel blog in 2024 might seem like a daunting task, but it can become a rewarding journey if approached step by step.
While it may take time to build a following, remember that persistence pays off. Whether you’re in it to share your adventures or grow a profitable business, the key is consistency and authenticity.
Ready to make your mark on the world of travel blogging?
Don’t wait—start today! Your blog could inspire countless others to explore the world and discover new horizons.